Share this
by 3devo on Dec 16, 2021 8:03:00 AM
When it comes to 3D printing, one of the top-notch materials to work with is Polyether ether ketone, otherwise known as PEEK. PEEK filament achieves some of the best results when 3D printing compared to other thermal plastics. As a high-performance plastic, its properties include excellent mechanical strength and resistance and outstanding chemical and thermal resistance. These properties allow it to aid in applications ranging from aerospace to medical.
Continuing the PEEK Filament Experiment
With our first-generation filament maker, the Next 1.0 Advanced Level, we were able to test with PEEK. Still, since introducing the next generation of our filament makers, the Precision and Composer, we wanted to show you how you can process PEEK and successfully create PEEK filament.
We documented our journey through a three-part video series and will now be releasing blogs to support the message of each video.
So, if you’re curious about creating PEEK filament, but aren’t sure where to start, continue reading to see how we did it, any issues we face and how we fixed them. Let’s start with the first part; preparation and transition.
Before 3D Printing PEEK Filament
You may already be convinced that PEEK is the polymer for you and your 3D print, but you may not be aware of the challenges you can face with extruding or 3D printing. PEEK is a semi-crystalline plastic, meaning it has a highly ordered molecular structure with sharp melting points.
Sharp melting points mean that PEEK doesn’t gradually soften as temperatures increase. Instead, its molecules stay solid until a certain amount of heat is absorbed, and then it rapidly changes into a low viscosity liquid. To combat the challenges that are present with PEEK and other semi-crystalline plastics, you’ll need to control the temperature of the heated chamber of your 3D printer, as well as the airflow.
We must mention and remind you that not all polymers are the same, even from the same family. There are many different grades of polymers, meaning one grade of PEEK is not the same as the next. The grades can differ in material properties and processing, determine the application, and depend on the supplier. The types of applications that different grades can be used for are; injection molding, extrusion, and 3D printing. Since we’ll be extruding PEEK filament, we went for Primetec® 110G.
Gathering Technical Data on (your) PEEK Filament
When you buy PEEK or any other plastic for that matter, you’ll receive a technical datasheet along with your pellets. And it’s essential you look at it before jumping into your extrusion tests.
On most technical datasheets, you’ll find various properties and profiles for working with your material; for this case these are the two we focused on:
- Thermal Profile – This will show you the temperatures you can use for injection and extrusion applications.
But, we want to find our own temperature profile, so we need to know the melting point of our plastic. For us, that’s 343°C. So, now we know how we can melt the PEEK in our filament maker to give it a new form as PEEK filament. - Drying Instructions – PEEK is a hygroscopic plastic, meaning it absorbs a certain amount of moisture inside its structure. By not removing it, we risk having bubbles present in the final product. On our datasheet we can see that we need to dry it for four hours at 150°C.
We’ll do this with our AIRID polymer dryer before putting the PEEK into our filament maker. Feel free to try other drying methods if you don’t have a designated plastic dryer at hand.
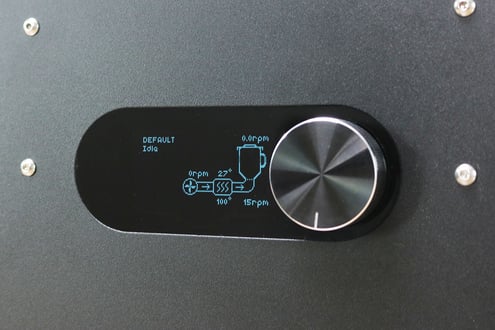
Getting Our Dryer Started
The Process to PEEK Filament - Explained
Now that we’ve gotten the information we need from the technical datasheet, we can determine our starting point.
And that starting point is finding the proper settings. It’s good to know that it can take time to find the correct settings to get a nice spool of PEEK filament since you have to learn how to process the material in your filament maker. Because, while you may have all the information you need on your technical datasheet, each machine will need tweaks as the material can act differently in it.
Getting an Output of PEEK
Based on our first output of PEEK filament, we can perform an iteration step; learn something new about the material, and from there, we can start building our temperature profile.
It’s an iterative process, and it can take some time. So you have to remember you won’t achieve good results straight away; there will be a learning curve. But, we’ll have quality settings to make quality filament in the end.
Specifying Starting Settings
To get quality PEEK filament, we refer to our technical datasheet. You’ll find starting settings for extruders on it, but again, it does not mean it will apply to your machine. So, let’s determine our own settings.
We’re looking for a flat baseline, where all heaters are 10-20% above the melting point; this ensures a good flow of material and that it’s molten when it comes out of the machine.
Next, we need to look at the screw speed and fan cooling. We’ve set the screw speed to 5RPM as good results tend to be achieved between 2-8RPMs, so we’re going for something in the middle. Our filament makers have a max RPM of 15, but going so high can ruin your chances to get quality filament.
For our fan speed, we’ll set it at 50%, also because this is nicely in the middle.
You might wonder why we don’t turn off the fan entirely now since we’re not actively making filament, and we’re just trying to get a quality output. The heaters are controlled by a PAD system, so it stabilizes the heaters’ temperatures and learns how much heat is lost and when to apply more heat. So, if you use more cooling at the nozzle at some point, the PAD control will get confused and has to relearn everything once more. Whereas if you turn on the cooling fans from the beginning, that will be taken into the learning process straight away, making the process smoother.
Now that we’ve adjusted our settings, let’s get into transitioning!
Necessary Transitioning Steps
As mentioned earlier, because of PEEK’s hygroscopic nature, we made sure to dry it in our AIRID polymer dryer to ensure we don’t experience any uncontrollable faults in our filament. To ensure a sufficient flow, we turned all our heaters to 400°C (10-20% above the melting point).
As the heaters heat up, the PLA already in our filament maker will begin t come out, but we need to make sure heaters don’t get to 400°C while the PLA is in the extruder, or else it will burn. To help with the transitioning of temperatures, it’s crucial to have a transitioning material. We’ll be using Devoclean Purge in Mid Temp and High Temp for the high temperatures we want to reach.
For us to go from PLA at 200°C to PEEK at 400°C, we’ll use a 2-fold transitioning process.
- Starting with our Mid Temp. It’ll help us push the PLA out of the machine until our heaters reach 300°C.
- Using the High Temp, we’ll be able to push the Mid Temp out and get us to 400°C, without burning any material in our extruder.
The transitioning process can take up to an hour, so if you know how to multitask, you can start the transitioning during your drying process! That way, your filament maker will be ready to go as soon as your PEEK is!
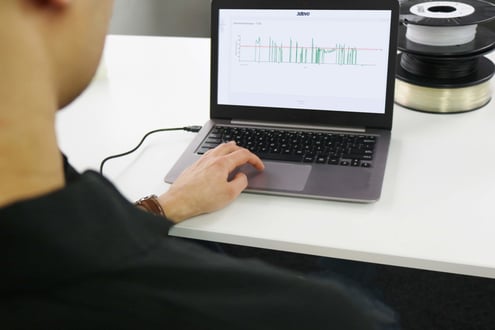
Start Your Data-logging
Before we get started, we want to start logging our experiment. It’s useful to do this because you can keep track of all your data during your experiment and learn a lot from it! For example, you’re able to see if the quality of your filament is where you want it to be, and that way, check if you’re moving in the right direction.
We connected our filament maker directly to our laptop and opened up our DevoVision app. When you create a new log, the machine resets. That’s why we always start our log before starting our experiments because if the extruder resets while you have PEEK inside, you’ll have a long battle waiting ahead of you.
Once the log has started, you can restart the extrusion process, and follow the data as it updates in real time.