Share this
by 3devo on Jan 18, 2022 9:36:00 AM

We’ve finally reached the third and final part of the PEEK Filament Extrusion experience. Last time we went over finding the correct settings for extruding PEEK and the steps to increase your filament maker’s temperatures.
Now that Heater 1 has reached 450°C, and we’ve been getting a nice and stable output of our PEEK filament., we can go through any finetuning steps before moving into spooling.
Making Adjustments
On our DevoVision log, we can see where our current tolerance is and where we want it. As tends to be the standard in filament production, we want our filament to be within the 50-micron industrial tolerance.
The puller mechanism controls the filament tolerance, and the optical sensor measures the real-time thickness. Based on that, the puller wheels pull as tight as possible to stay within your chosen tolerance.
To avoid the puller mechanism adjusting too often, you must have a steady flow; this is why we let the filament maker extrude the PEEK output for a bit to make sure we have a somewhat steady flow.
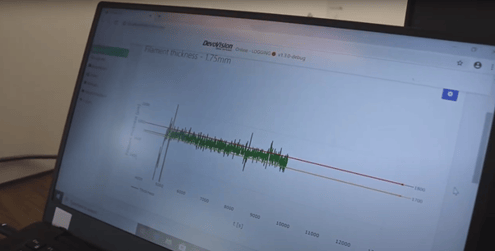
Here you can see the current tolerance of our PEEK filament (green), the red and yellow line show where we would like it to be between.
To stay within the tolerance, we can move on to finetuning each heater individually. While we’ve set a good baseline for the output of PEEK, we need to make it even better before we can start spooling. When we start playing around with the temperatures of the heaters, we might make mistakes, and we don’t want those mistakes being spooled.
We’re going to start with adjusting and playing around with the temperatures of heaters three and four; decreasing the temperatures of the two so we can have an ascending temperature profile. We’ll keep changing the temperatures until we have a super tight tolerance and stable output.
Before we begin, we must remind you to stay patient. Finding the best settings to extrude PEEK requires several minor adjustments. We have to ensure we wait long enough between each adjustment so it can have an effect. By exploring the operation window, we’ll learn a lot about how the plastic behaves and how we can extrude our filament nicely.
Understanding Your Data Log
Before we move into finetuning, we must know how to read our data log and what we can understand about our PEEK filament.
RPM Fluctuation
The first part of the filament maker (where the feeding takes place) correlates to any changes in your RPM. Of course, you’ll want to have a stable RPM, but if you see that it’s fluctuating a lot, the filament maker is having difficulty pushing the material through.
If you have some unmelted particles, it might clog your screw, and the motor will need more power to push these pellets through. You want your RPM to be as stable as possible because if the screw suddenly increases or decreases in speed, your output will be influenced. An increase in RPM means an increase in output and a decrease in RPM results in a decrease in output.
Extruder Current
In an industrial extruder, you’ll find a pressure sensor, where you can see if good pressure is being built up, which is very important for extrusion. But, unfortunately, we don’t have that in our case, so instead, we look at our extruder current.
The extruder current shows us how much power is needed to rotate the screw. Usually, this current is around 2000 milliamps, which should remain pretty stable. However, if it fluctuates, it could mean that something is not quite steady in the feeding process; if the current is low, it means that there’s not enough pressure, and if it’s high, it could mean that something is clogging the front of your filament maker (where the output extrudes).
While you look at your data log to view the extruder current or RPM, you should also check on your extruded filament, making sure it’s smooth, homogeneous, and shiny, without any burnt or unmelted particles. Keeping an eye on both the log and extruded filament will help you achieve the correct settings, resulting in good results.
We need to mention that we’re making and sharing our adjustments for this specific grade of PEEK (Prime Tech 10g). As mentioned before, every grade of PEEK will require different settings than what we end up with, but generally, a nice baseline of 400°C works for all the grades of PEEK we’ve experimented with.
Still, keep in mind that you may have to adjust your tweaks slightly differently than us.
Finetuning
We decided to start our finetuning process by decreasing heater number four by 10°C, and once we did, we saw some changes. Our data log showed our motor current stabilizing and increasing slightly, which means that more pressure is being built up. Not only does this make the flow more stable, but it influences the tolerance. Our tolerance has almost reached 50microns, though there were some peaks, it’s safe to say we’re heading in the right direction.
Something we noticed and which can’t be read by our sensor (an optical sensor with a unidirectional way of reading) is that our filament became oval when moving through the puller wheels. This means that when the PEEK reaches the puller wheels, it’s too hot and too soft. We have different options on how we can fix this:
-
- The temperature of the heaters: We increased heater one to 405°C, as we noticed that at the lower temperature (400°C), the surface of the PEEK was a bit rough.
- RPM: We can decrease the RPM, so we get a slower output and more time to cool the filament before reaching the puller wheel. But, this solution might be tricky. If you decrease it, the heating system will also be influenced because the material passes through the system slowly, resulting in less pressure and less friction, so more power will need to be generated by the heaters.
- Fan Speed: By increasing the fan speed, the PEEK will get more cooling before being able to become oval.

An example of oval filament
We decided to change the fan speed as it’s the quickest and easiest solution to see if we’ve been able to fix our oval PEEK issue. However, it’s worth mentioning that the fan speed depends on the room temperature, so depending on where you’re extruding, you might need different fan speeds.
We increased the fan speed by 20% and could almost immediately see a difference in our filament. It didn’t seem to be flattened anymore, but we did see a negative influence on tolerance.
Because the increased fan speed solidifies the material faster, the puller mechanism can’t pull it to your desired thickness. So, we decreased our fan speed by 10% in hopes of solidification happening around the sensor block.
Spooling PEEK Filament
Now that our tolerance is looking good and our output is no longer solidifying too early, we can move on to spooling!
While we’ve gotten our tolerance to the industry standard, it’s arbitrary, and the settings and tolerance you work with may vary depending on your 3D printer. It took us two hours to finetune and get the type of output we were looking for; again, the time and energy needed for this varies depending on the grade and quality of PEEK you’re using. In some extreme cases, it can take a few days of pure experimentation and exploring the window of operation to find the correct settings.
Be sure to add the correct dimensions of your spool to your filament maker so that the filament spools in neat rows. You must do this so when you move on to your 3D printing stage, your filament doesn’t end up tangled as you 3D print. There’s nothing worse than ruining great results and settings with badly spooled filament.
Once you’ve attached your filament to the spool, close the filament maker’s door to create an even more stable environment for the extruded filament because if someone walks into the room which you’re spooling in, you’ll get some more airflow in the room and that might cool down the filament. Keep in mind that when you close the door, heat will tend to accumulate inside the chamber, and with some sensitive plastics, you might have to adjust the fan cooling a bit more.
Now that you’ve spooled the amount of PEEK filament that you need, we can start the process of ending the extrusion.

Ending the Process Properly
When extruding PEEK, it is crucial that you don’t just switch off your machine. We need to purge our machine so that there is no PEEK left behind, as it will crystalize and cause problems when we want to use our filament maker another time.
In our previous blog on finding the correct settings, you’ll know that we gradually built the temperature of the filament maker using DevoClean MidTemp and HighTemp. And now, to get the PEEK out and have our filament maker ready for another experiment, we have to reverse that same method using our two DevoClean materials to bring the filament maker’s temperature down.
We start with our DevoClean HighTemp at the current temperature (400°C), and once we’ve purged out our PEEK and only have DevoClean High Temp coming out, we can decrease the temperature to 300°C.
Once we’ve reached 300°C, we’ll start adding our DevoClean MidTemp. Once we only have an output of DevoClean MidTemp, we can finally switch off our machine. But, again, you mustn’t switch off the extruder with any PEEK or DevoClean HighTemp left within it because as they cool down, both materials end up hard as a rock.
Final PEEK Spool
Now that you’ve spooled PEEK and found the correct settings and finetuning bits needed to get a great spool of filament, you can now skip the research part of the experiment next time you want to extrude a new spool of PEEK filament! If you encounter any additional issues, visit our support platform, where we update articles related to the most common problems experienced when extruding filament!